
How to Save Command Line Output to File on Windows, Mac, and Linux
- Technology Explained
- September 8, 2023
- No Comment
- 28
Command Line Output to File on Windows, Mac, and Linux
When you run a terminal command, it usually displays output in the terminal, allowing you to view it in real-time. However, there are times when you need to save this output for later analysis or combine it with other tools. In this guide, we will explore how to redirect command-line output to a file on Windows, Mac, and Linux.
Redirect Command-Line Output to a File
There are two operators you can use to redirect the output of a command to a file: > and >>. It’s crucial to understand the difference between the two to prevent unintentional data loss.
The > Operator
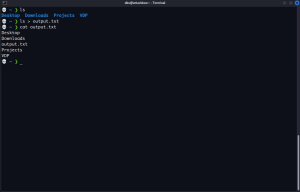
The > symbol creates a new file or overwrites it if it already exists. If the file does not exist, it will be created. To use it, type the command, specify the > operator, and provide the path to the file where you want to redirect the output. For instance, to save the output from the ls command, which lists the contents of a directory, you would use:

To view the contents of the file in your terminal, you can use the cat command:

The >> Operator
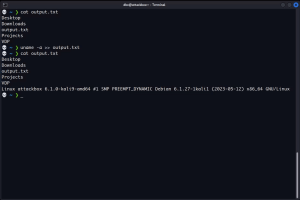
The >> operator also creates a new file if it doesn’t exist, but it won’t overwrite an existing file. Instead, it appends the text to the end of the file. If you want to save the output from multiple commands to a single file without losing previous output, use the >> operator. For example, to append system information to the file you just created, run:

Repeat this process as needed to keep adding command output to the end of the file.
Print Output to Screen and Redirect It to a File
The > and >> operators only send output to a file and don’t display it on the screen. To view the output on the screen while redirecting it to a file, you can use the tee command.
Using tee to Display and Redirect Output
To use the tee command, send the output from another command to it using the pipe operator (|). For example, to send the output of the ls command to tee, which will display it on the screen and save it to a file, use:

This command overwrites the file or creates a new one if it doesn’t exist, similar to the > operator.
Appending Output to a File with tee
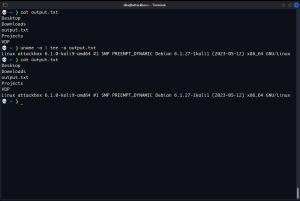
To append output to the end of a file while displaying it on the screen, add the -a flag before the file path:

You will see the command output on your screen, and you can use cat to confirm that tee has also added it to the file.
Take Advantage of the Command Line’s Power
Redirecting output to a file is just one of the many capabilities of the command line. You can also redirect errors, monitor system activity, and combine data from various sources. While the command line may have a learning curve, its commands are expressive, composable, and often quicker than GUI alternatives.
In conclusion, mastering output redirection is a valuable skill for anyone working with the command line on Windows, Mac, or Linux.
Table: Key Concepts
| Operator | Functionality | Example |
|---|---|---|
> |
Creates or overwrites | ls > /path/to/file |
>> |
Appends to file | uname -a >> /path/to/file |
tee |
Display and redirect | `ls |
Table: Appending Output with tee
| Command | Functionality |
|---|---|
| `uname -a | tee -a /path/to/output.txt` |
In this article, we’ve explored how to redirect command-line output to files on Windows, Mac, and Linux, understanding the nuances between > and >> operators, and using the tee command to display and redirect output. With these skills, you can efficiently manage and analyze command output to solve problems and enhance productivity.