
Create Personalized Apple Watch Face from Your Photos
- Technology Explained
- August 15, 2023
- No Comment
- 23
Introduction: Apple Watch Face from Your Photos
The Apple Watch is renowned for its customizability, allowing users to personalize various aspects, including the watch face. Did you know that you can create your own watch face using any image from your Photos app? This article will guide you through the process of crafting a custom watch face that reflects your individuality and style.
Creating a Custom Apple Watch Face From a Photo
To get started, ensure that the photo you wish to use is stored in your iPhone’s Photos app. This serves as the foundation for your unique watch face. If you’re having trouble locating a recently downloaded image, our guide on finding files on an iPhone can help.
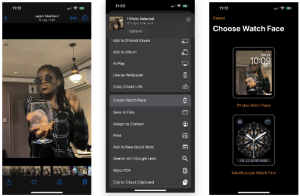
Once your chosen image is in the Photos app, follow these steps to send it to the Watch app:
Open the desired photo and tap the Share button at the bottom-left corner.
For multiple images, tap Select and choose your preferred options before hitting the Share button.
Scroll down the Share Sheet until you find the Create Watch Face option and tap it to access the watch face creator.
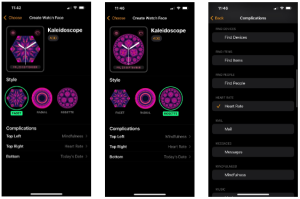
Choose Your Watch Face’s Style: Photos Watch Face and Kaleidoscope Watch Face
When creating your custom watch face, you have two primary style options: Photos Watch Face and Kaleidoscope Watch Face.
Photos Watch Face:
This style preserves your image’s integrity and offers several customization options:
Color: Select the color wash for your image.
Content: Choose photos to cycle through as you raise your wrist.
Time Position: Decide whether to place the time at the top or bottom.
Complications: Add widgets above and below the time, such as date, schedule, battery level, and more.

Kaleidoscope Watch Face:
For a more artistic approach, explore the Kaleidoscope Watch Face style with options like Facet, Radial, and Rosette designs. Complications are placed at various positions, allowing further personalization.
How to Edit Your Custom Watch Face
Editing your custom watch face is easy and can be done either directly on the watch or via the Watch app on your iPhone:
Find the watch face you want to edit under My Faces in the Watch app and tap on it.
Explore the watch face editor where you can customize and tweak various elements.
You can set the current watch face or remove it based on your preferences.
Create as Many Custom Watch Faces as You Like
The beauty of creating custom watch faces is that you can make as many as you desire. Experiment with different combinations, mix photos, albums, and complications to match your mood and style. Whether it’s showcasing loved ones, family, pets, or favorite objects, the possibilities are limitless.
Conclusion:
Embrace the freedom to personalize your Apple Watch with custom watch faces made from your cherished photos. With this step-by-step guide, you can create a truly unique timepiece that reflects your personality and adds a touch of creativity to your daily routine. Explore the options, experiment, and enjoy your one-of-a-kind wrist companion.