Backup Mac to External Hard Drive: A Step-by-Step Guide
- Tech news
- July 24, 2023
- No Comment
- 31
Introduction: Why Backup Mac to an External Hard Drive
Ensuring the safety and security of your valuable data by backing up your Mac is a crucial step. The preinstalled backup solution on macOS Ventura called Time Machine presents a costless and user-friendly choice. Certain users may favor alternate backup solutions which come with added features. In this detailed handbook, we will assist you in the whole process of making a copy of your Mac’s data to an external HDD employing Time Machine. We will also explore alternative backup options.
Step-by-Step Guide: Backing up Your Mac with Time Machine
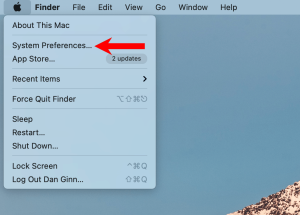
Discover System Preferences with on the Apple Menu in the Apple Menu
In order to commence the backup procedure, find and click on the Apple logo located in the top-left corner of your desktop. Next, select “System Preferences.”
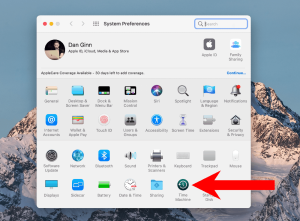
Select Time Machine
Inside the configuration panel, look for “Time Machine” located in the bottom row. Click on it to access the Time Machine settings.
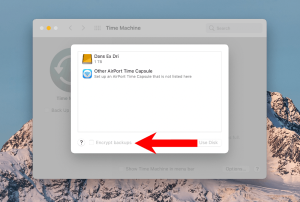
Select Backup Disk
Clicking on “Select Backup Disk” inside the Time Machine window allows you to specify the location for backing up your Mac. Opt for your external hard drive and select the action “Use Disk.”

Select the HDD and Secure the Backup
Next, click “Select Disk” and choose your hard drive again. Opt to “Encrypt Backups” to add an extra layer of security to your files, protecting them from unauthorized access.
Craft a Password for Securing Your Backed-up Files
In case you decide to encrypt your backup, a password creation prompt will appear. Always ensure the safety of your password, because it’s vital for retrieving your backups.

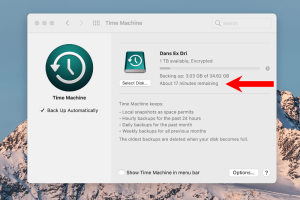
Wait for Backup to Begin
Upon completing the encryption of your disk,, go back to the main Time Machine window. “Backup Automatically” must be enabled for proper functioning, Your backup will be prepared by Time Machine. Take a seat while Time Machine takes care of automatically backing up your Mac, and an alert will be provided once the process is done.
Alternatives to Time Machine for Backing up Mac
Whilst Time Machine provides a reliable option for backups, some users could favor alternatives that provide additional features and greater flexibility. Here are a couple of noteworthy alternatives to consider:
iDrive: A Popular Backup Solution
iDrive provides a thorough backup option. In addition to supporting backups with external hard drives but also provides the option to backup your data to the cloud. Users who want extra versatility and security often favor its hybrid backup approach.
Using Disk Utility for Disk Image Backups
The Disk Utility app provides another alternative for backing up your Mac entails using the Disk Utility app for backing up purposes. Creating a drive disk image is part of this method. Transferring it as a file to another computer is possible, or you can utilize it as a backup for your current system. Remember that disk utility does not have automated backups, resulting in reduced convenience for regular backups when compared to Time Machine.
How to Backup Mac Without an External Hard Drive
In case an external hard drive is not suitable for your requirements, additional methods exist to back up your Mac. Two prominent options are:
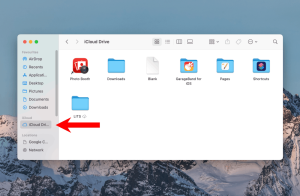
Backup to iCloud
You can backup your Mac’s contents to iCloud, Apple offers its own cloud storage platform. Nevertheless, the 5GB of complimentary storage offered might not meet the needs of majority of users. According to how much storage you require, additional iCloud storage may be required.
Alternatives to iCloud
Explore options from providers such as Backblaze or Carbonite, which include automatic backup functionality, limitless storage options, and reliable encryption to ensure your files’ privacy and security.
Before You Backup Your Mac to an External Hard Drive
Before initiating the backup process, follow these steps:
Get Rid of Junk Files:
Declutter your Mac by removing excess files and clearing away any unneeded clutter to create more storage space. to free up storage space.

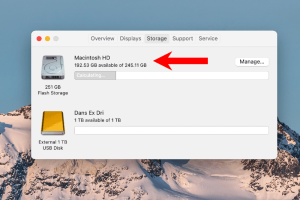
Check Available Storage on Mac:
To ensure enough space for backups, verify the amount of available storage on your Mac.
Make Sure Your Hard Drive Is Properly Formatted. When utilizing a fresh or formerly Windows-configured external hard drive, ensure it is compatible with macOS by reformatting it.
Restituting Your Mac utilizing a Time Machine Backup
If you need to restore your Mac from a Time Machine backup, follow these steps:
Open Migration Assistant: Locate and open Migration Assistant from within Launchpad’s ‘Other’ folder.
Select How You Want to Transfer Your Information: Choose “From a Mac, Time Machine, or startup disk.”
Select Your External Hard Drive: Pick the external HDD where you have saved your Time Machine backup.
Select Which Time Machine Backup You Want to Restore: If you have multiple backups, choose the desired one.
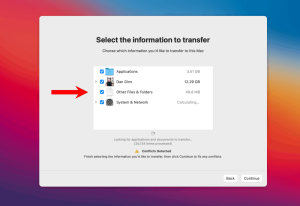
Select What Information You Want to Restore: Determine which files you wish to restore and commence initiating the restoration process.
Final Thoughts: Backup Mac Options
It’s wise to back up your Mac to a clever choice for protecting your important information. Even though Time Machine presents a basic and free alternative, Various alternatives to backup services like iDrive, Backblaze, or Carbonite deliver a wider range of comprehensive functionalities for better safeguarding of data. Pick a backup approach that is tailored to your individual requirements and personal taste to ensure your valuable files are safe and accessible whenever needed.