Backup Disks for Time Machine:External Drives, NAS, and More
- Tech news
- July 26, 2023
- No Comment
- 40
Backup Disks you can use with Time Machine
Backing up your Mac is of utmost importance as it shields your data from unforeseen situations like hardware failures, inadvertent deletions, or system crashes. The backup feature called Time Machine in macOS, offers an exceptional solution for automatically backing up your Mac. For optimal usage of Time Machine, a compatible backup drive is required. The focus of this guide is on examining the multiple options for storage devices that are supported by Time Machine, which will ultimately safeguard and enable easy recovery of your important data.
External Drive Connected to Your Mac
Time Machine can easily back up your data connected to to your macOS device. The connection options for this drive include USB, Thunderbolt, and FireWire ports. After the initial connection of the external drive, Time Machine will ask you to properly format it for backup functions. Should the drive be in an incompatible format, There is a possibility that Time Machine will propose deleting its contents and configuring it as a backup disk.
Network-Attached Storage (NAS) suitable for Time Machine backups
In case you favor a backup solution that offers more flexibility or if you need to back up several Macs on a network, employing the use of a Network-Attached Storage (NAS) device is possible. Time Machine over SMB (Server Message Block) support is expected from this device. You will discover that many third-party NAS devices support Time Machine, and the specifics regarding compatibility can be found in the documentation provided by your NAS device.
Utilizing Another Mac as a Time Machine Backup Location
When using macOS Ventura or any subsequent version, you can select another Mac within your network and designate it as the Time Machine backup destination. To set up this configuration, follow these steps on the Mac you want to use as the backup destination:
Access the Apple menu > System Preferences.
Select General from the sidebar, Next, locate Sharing on the right side.
Turn on File Sharing and if necessary, input your admin password.
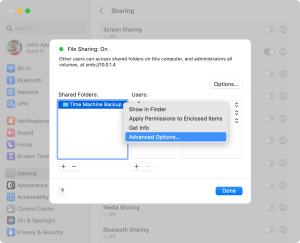
Choose the information symbol adjacent to File Sharing.
Choose the add button (+) that is situated under the Shared Folders list, Afterwards, designate a folder that will serve as Time Machine backup location.
Control-click the added folder and pick the Advanced Configuration.
Check “Share as a Time Machine backup destination,” Finally, conclude by pressing OK.
Upon finishing these steps, when configuring Time Machine, your other Mac computers can select the shared folder as their backup disk.
In case you have a previous edition of macOS, the steps are comparable, however, to access File Sharing, navigate to System Preferences > Sharing. Follow the same steps to select a folder for Time Machine backups and enable it as a Time Machine backup destination.
Time Machine Backup with AirPort Extreme Base Station or AirPort Time Capsule
In case you own the AirPort Extreme Base Station (802.11ac model) or the AirPort Time Capsule, there is the alternative of employing a USB drive that is externally connected for backing up through Time Machine. Follow these steps to set it up:
Link the external drive to your Mac and employ Disk Utility for wiping it.
Link up the drive with a USB port situated on your AirPort base station then switch it on.
Launch AirPort Utility Then choose your base station. Choose Edit to view its configuration. for accessing the available configurations.
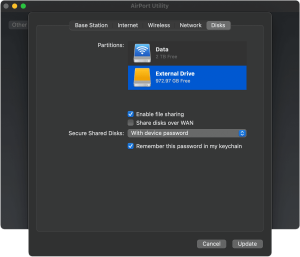
Accessing the settings window, choose the Disks tab.
Pick your backup disk from the listed partitions, then check “Enable file sharing.”
Multiple users within your network can utilize this disk for their Time Machine backups. with Time Machine. For exclusive viewing rights to individual backups, leverage the Secure Shared Disks functionality.
Choose Update to restart your base station and enforce the settings.
After connecting your external drive to the AirPort base station, You can now utilize Time Machine for wirelessly backing up your Mac.
Conclusion
Time Machine provides multiple choices for ensuring dependable backups of your Mac. If you lean towards connecting an external drive directly to your Mac or opting for a network-based solution like NAS or another Mac, Time Machine provides the necessary coverage. Maintaining a regular backup routine will grant you tranquility, as you know your important data is safeguarded. Should the need arise, restoring it is a straightforward process. should the situation demand.